

This Java program demonstrates the source code of virtual machine in java with a custom-designed graphical user interface (GUI). Unlike comprehensive operating system emulators that simulate entire software environments, this VM provides a simplified simulation of a CPU-like system. It is specifically tailored for educational purposes, offering users an insightful look into basic CPU operations through an interactive and user-friendly interface.
Introduction of virtual machine
Virtual machines (VMs) are powerful tools in the world of computing, often used to run different operating systems or software environments on a host system. However, the concept of a VM can be scaled down to simpler educational purposes, where we simulate basic CPU operations such as loading values into registers, performing arithmetic, and printing results. In this blog post, we’ll explore a simple virtual machine implemented in Java with a graphical user interface (GUI). This VM is designed to be both easy to understand and interact with, making it a great learning tool for beginners.
What is a Virtual Machine?
At its core, a virtual machine is an emulation of a computer system. It provides the functionality of a physical computer, allowing software to run as if it were on a real machine. In complex scenarios, VMs can run entire operating systems, but our Java-based virtual machine is much simpler. It simulates basic CPU operations, allowing users to input instructions, manipulate data in registers, and view the results—all within an easy-to-use GUI.
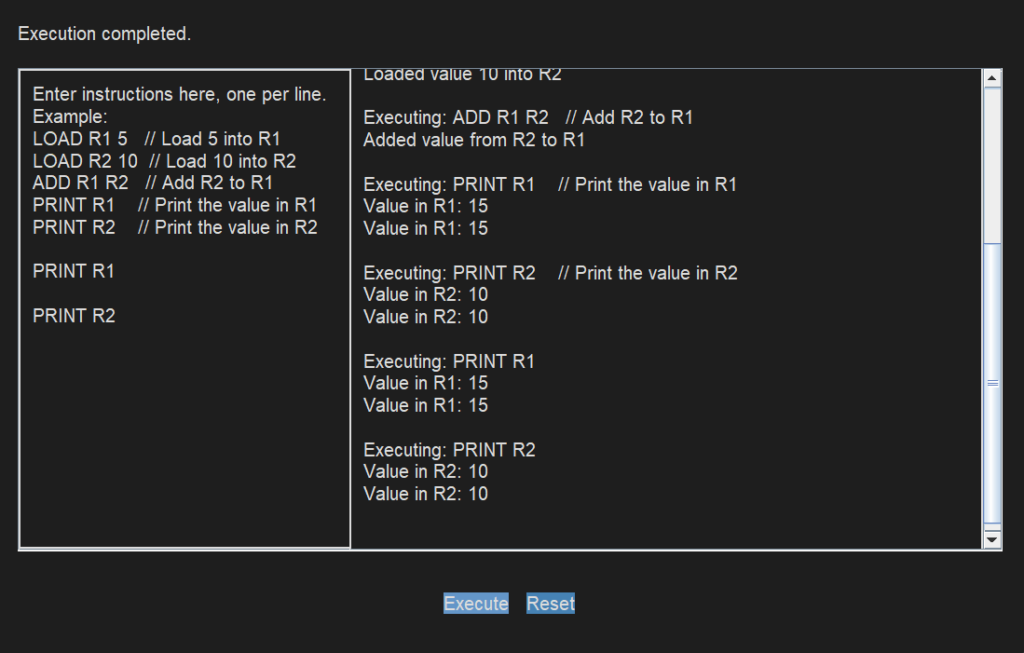
Example Output of the Virtual Machine
Input Instructions:
LOAD R1 5
LOAD R2 10
ADD R1 R2
PRINT R1
PRINT R2
Expected Output:
Executing: LOAD R1 5
Loaded value 5 into R1

Executing: LOAD R2 10
Loaded value 10 into R2

Executing: ADD R1 R2
Added value from R2 to R1

Executing: PRINT R1
Value in R1: 15

Executing: PRINT R2
Value in R2: 10
Explanation:
LOAD R1 5: The instruction loads the value5into registerR1. The output confirms this action.LOAD R2 10: This instruction loads the value10into registerR2. The output shows that the value has been successfully loaded.ADD R1 R2: TheADDinstruction adds the value inR2(which is10) to the value inR1(which is5). After this operation,R1now contains15. The output confirms the addition operation.PRINT R1: This command prints the value stored inR1, which is15, reflecting the result of the addition operation.PRINT R2: This command prints the value stored inR2, which remains10, as it was not changed by any operation.
This example demonstrates how the virtual machine processes instructions, updates registers, and produces output based on the executed commands.
Key Components of Our Virtual Machine
- Registers
- Definition: Registers are small, fast storage locations within a CPU. They temporarily hold data and instructions during processing.
- In Our VM: We have three registers (
R1,R2, andR3). These registers are used to store and manipulate integer values as the VM executes instructions.
- Memory
- Definition: Memory is used to store data and instructions that the CPU needs to access quickly. It can be thought of as a larger storage space compared to registers.
- In Our VM: We have a small memory array of 256 integers. Although this memory is not heavily used in the basic implementation, it simulates a more extensive storage area where data could be kept for longer-term use.
- Instruction Set
- Definition: An instruction set is a collection of commands that the CPU can understand and execute. These commands direct the CPU to perform various operations.
- In Our VM: The instruction set includes:
- LOAD [REGISTER] [VALUE]: Loads a specified integer value into a register.
- ADD [REGISTER1] [REGISTER2]: Adds the value from one register to another register.
- PRINT [REGISTER]: Outputs the value stored in a register.
- Execution Flow
- Definition: The execution flow refers to the sequence in which instructions are processed and executed by the CPU.
- In Our VM: Users input multiple instructions, which the VM executes one by one. Each instruction updates the registers or memory and produces output accordingly.
NOTE
You can get the source code of virtual machine in Java from the GitHub repository
or you can also download its zip file
User Interface
The java project on virtual machine with GUI (graphical user interface) is designed to be intuitive and user-friendly, featuring the following elements:
- Instruction Area
- Purpose: This is where users input the instructions they want the VM to execute.
- Features: The text area supports multi-line input, allowing users to enter several instructions at once. It is equipped with a modern, dark theme to reduce eye strain and improve readability.
- Output Area
- Purpose: This displays the results of executed instructions and any feedback or errors.
- Features: The output area is read-only and shows the results of instructions, such as the values in registers after operations. It uses the same dark theme to maintain consistency with the instruction area.
- Control Buttons
- Execute Button: This button triggers the execution of all instructions entered in the instruction area. It processes the commands sequentially and updates the output area with results and status messages.
- Reset Button: This button resets the VM, clearing the registers and output area, and preparing the VM for new instructions.
- Status Label
- Purpose: This provides real-time feedback to the user about the current state of the VM.
- Features: The status label displays messages such as “Enter instructions and click ‘Execute'” or “VM reset. Ready for new instructions.” It helps users understand what actions they need to take or what has just occurred.
Working Explanation of virtual machine
- Entering Instructions: Users type instructions into the instruction area. Each instruction must be on a separate line and follow the syntax defined by the instruction set.
- Executing Instructions: When the “Execute” button is clicked, the VM processes each instruction in the order they were entered. The VM updates its internal state (registers and memory) based on the instructions and displays the results in the output area.
- Viewing Results: The output area shows the results of the executed instructions, including any values in registers or error messages if an invalid instruction was entered.
- Resetting the VM: Clicking the “Reset” button clears the VM’s registers and output area, allowing users to start fresh with new instructions.
Conclusion
This simple project on virtual machine in java with GUI provides a hands-on learning experience for understanding basic CPU operations and programming concepts. By interacting with this VM, users can learn how registers and memory are used, how instructions are executed, and how results are produced. The enhanced UI design ensures that the virtual machine is approachable and visually appealing, making it an excellent tool for educational purposes.
source code of virtual machine in java
Let’s dive into the code which explain working of virtual machine with source code in java. The code is written in Java and uses the Swing framework for the graphical user interface.
import javax.swing.*;
import java.awt.*;
import java.awt.event.ActionEvent;
import java.awt.event.ActionListener;
import java.util.HashMap;
import java.util.Map;
//create you own virtual machine in java

 class CoolEnhancedVM extends JFrame {

    private Map<String, Integer> registers = new HashMap<>();  // Registers (R1, R2, R3)
    private int[] memory = new int[256];  // Memory storage

    // GUI components
    private JTextArea instructionArea;
    private JTextArea outputArea;
    private JButton executeButton;
    private JButton resetButton;
    private JLabel statusLabel;

    public CoolEnhancedVM() {
        // Initialize registers
        for (int i = 1; i <= 3; i++) {
            registers.put("R" + i, 0);
        }

        // Set up the GUI
        setTitle("Cool Enhanced Virtual Machine");
        setSize(900, 600);
        setDefaultCloseOperation(JFrame.EXIT_ON_CLOSE);
        setLocationRelativeTo(null);

        // Set up fonts and colors for a modern look
        Font font = new Font("Arial", Font.PLAIN, 16);
        Color bgColor = new Color(30, 30, 30);
        Color fgColor = new Color(220, 220, 220);
        Color btnColor = new Color(70, 130, 180);
        Color btnHoverColor = new Color(100, 150, 200);

        // Instruction area setup
        instructionArea = new JTextArea(12, 40);
        instructionArea.setFont(font);
        instructionArea.setBackground(bgColor);
        instructionArea.setForeground(fgColor);
        instructionArea.setCaretColor(fgColor);
        instructionArea.setBorder(BorderFactory.createCompoundBorder(
                BorderFactory.createLineBorder(fgColor, 2),
                BorderFactory.createEmptyBorder(10, 10, 10, 10)
        ));
        instructionArea.setLineWrap(true);
        instructionArea.setWrapStyleWord(true);

        // Output area setup
        outputArea = new JTextArea(12, 40);
        outputArea.setFont(font);
        outputArea.setBackground(bgColor);
        outputArea.setForeground(fgColor);
        outputArea.setEditable(false);
        outputArea.setBorder(BorderFactory.createCompoundBorder(
                BorderFactory.createLineBorder(fgColor, 2),
                BorderFactory.createEmptyBorder(10, 10, 10, 10)
        ));
        outputArea.setLineWrap(true);
        outputArea.setWrapStyleWord(true);

        // Buttons setup
        executeButton = new JButton("Execute");
        resetButton = new JButton("Reset");
        executeButton.setFont(font);
        resetButton.setFont(font);
        executeButton.setBackground(btnColor);
        executeButton.setForeground(fgColor);
        resetButton.setBackground(btnColor);
        resetButton.setForeground(fgColor);
        executeButton.setOpaque(true);
        resetButton.setOpaque(true);
        executeButton.setBorder(BorderFactory.createEmptyBorder());
        resetButton.setBorder(BorderFactory.createEmptyBorder());
        executeButton.setFocusPainted(false);
        resetButton.setFocusPainted(false);

        // Add hover effect to buttons
        executeButton.addMouseListener(new java.awt.event.MouseAdapter() {
            @Override
            public void mouseEntered(java.awt.event.MouseEvent evt) {
                executeButton.setBackground(btnHoverColor);
            }
            @Override
            public void mouseExited(java.awt.event.MouseEvent evt) {
                executeButton.setBackground(btnColor);
            }
        });
        resetButton.addMouseListener(new java.awt.event.MouseAdapter() {
            @Override
            public void mouseEntered(java.awt.event.MouseEvent evt) {
                resetButton.setBackground(btnHoverColor);
            }
            @Override
            public void mouseExited(java.awt.event.MouseEvent evt) {
                resetButton.setBackground(btnColor);
            }
        });

        // Status label setup
        statusLabel = new JLabel("Enter instructions and click 'Execute'.");
        statusLabel.setFont(font);
        statusLabel.setForeground(fgColor);

        // Panel for controls
        JPanel controls = new JPanel(new FlowLayout(FlowLayout.CENTER, 15, 15));
        controls.setBackground(bgColor);
        controls.add(executeButton);
        controls.add(resetButton);

        // Layout setup
        JPanel mainPanel = new JPanel(new BorderLayout(20, 20));
        mainPanel.setBackground(bgColor);
        mainPanel.setBorder(BorderFactory.createEmptyBorder(20, 20, 20, 20));
        mainPanel.add(new JScrollPane(instructionArea), BorderLayout.WEST);
        mainPanel.add(new JScrollPane(outputArea), BorderLayout.EAST);
        mainPanel.add(controls, BorderLayout.SOUTH);
        mainPanel.add(statusLabel, BorderLayout.NORTH);

        add(mainPanel);

        // Instruction input guidance
        instructionArea.setText(
                "Enter instructions here, one per line.\n" +
                        "Example:\n" +
                        "LOAD R1 5   // Load 5 into R1\n" +
                        "LOAD R2 10  // Load 10 into R2\n" +
                        "ADD R1 R2   // Add R2 to R1\n" +
                        "PRINT R1    // Print the value in R1\n" +
                        "PRINT R2    // Print the value in R2\n"
        );

        // Button actions
        executeButton.addActionListener(new ActionListener() {
            @Override
            public void actionPerformed(ActionEvent e) {
                executeProgram();
            }
        });

        resetButton.addActionListener(new ActionListener() {
            @Override
            public void actionPerformed(ActionEvent e) {
                resetVM();
            }
        });
    }

    // Executes the entire program
    private void executeProgram() {
        resetVM();
        String[] instructions = instructionArea.getText().split("\n");
        for (String instruction : instructions) {
            execute(instruction.trim());
        }
        statusLabel.setText("Execution completed.");
    }

    // Resets the virtual machine
    private void resetVM() {
        for (int i = 1; i <= 3; i++) {
            registers.put("R" + i, 0);
        }
        outputArea.setText("VM reset. Enter new instructions.\n");
        statusLabel.setText("VM reset. Ready for new instructions.");
    }

    // Executes a single instruction
    private void execute(String instruction) {
        if (instruction.isEmpty()) return;

        String[] parts = instruction.split(" ");
        String command = parts[0];

        outputArea.append("Executing: " + instruction + "\n");

        switch (command) {
            case "LOAD":
                load(parts[1], Integer.parseInt(parts[2]));
                outputArea.append("Loaded value " + parts[2] + " into " + parts[1] + "\n\n");
                break;
            case "ADD":
                add(parts[1], parts[2]);
                outputArea.append("Added value from " + parts[2] + " to " + parts[1] + "\n\n");
                break;
            case "PRINT":
                print(parts[1]);
                outputArea.append("Value in " + parts[1] + ": " + registers.get(parts[1]) + "\n\n");
                break;
            default:
                outputArea.append("Unknown instruction: " + command + "\n\n");
        }
    }

    // Load a value into a register
    private void load(String register, int value) {
        registers.put(register, value);
    }

    // Add the value of one register to another
    private void add(String register1, String register2) {
        int value1 = registers.get(register1);
        int value2 = registers.get(register2);
        registers.put(register1, value1 + value2);
    }

    // Print the value of a register
    private void print(String register) {
        outputArea.append("Value in " + register + ": " + registers.get(register) + "\n");
    }

    // Main method to run the VM
    public static void main(String[] args) {
        SwingUtilities.invokeLater(new Runnable() {
            @Override
            public void run() {
                new CoolEnhancedVM().setVisible(true);
            }
        });
    }
}
Interesting project. There should be more emphasis in describing how the code works. But a very unique project, just as expected from GUI projects!